Chef Julian Moreau
INTRODUCTION
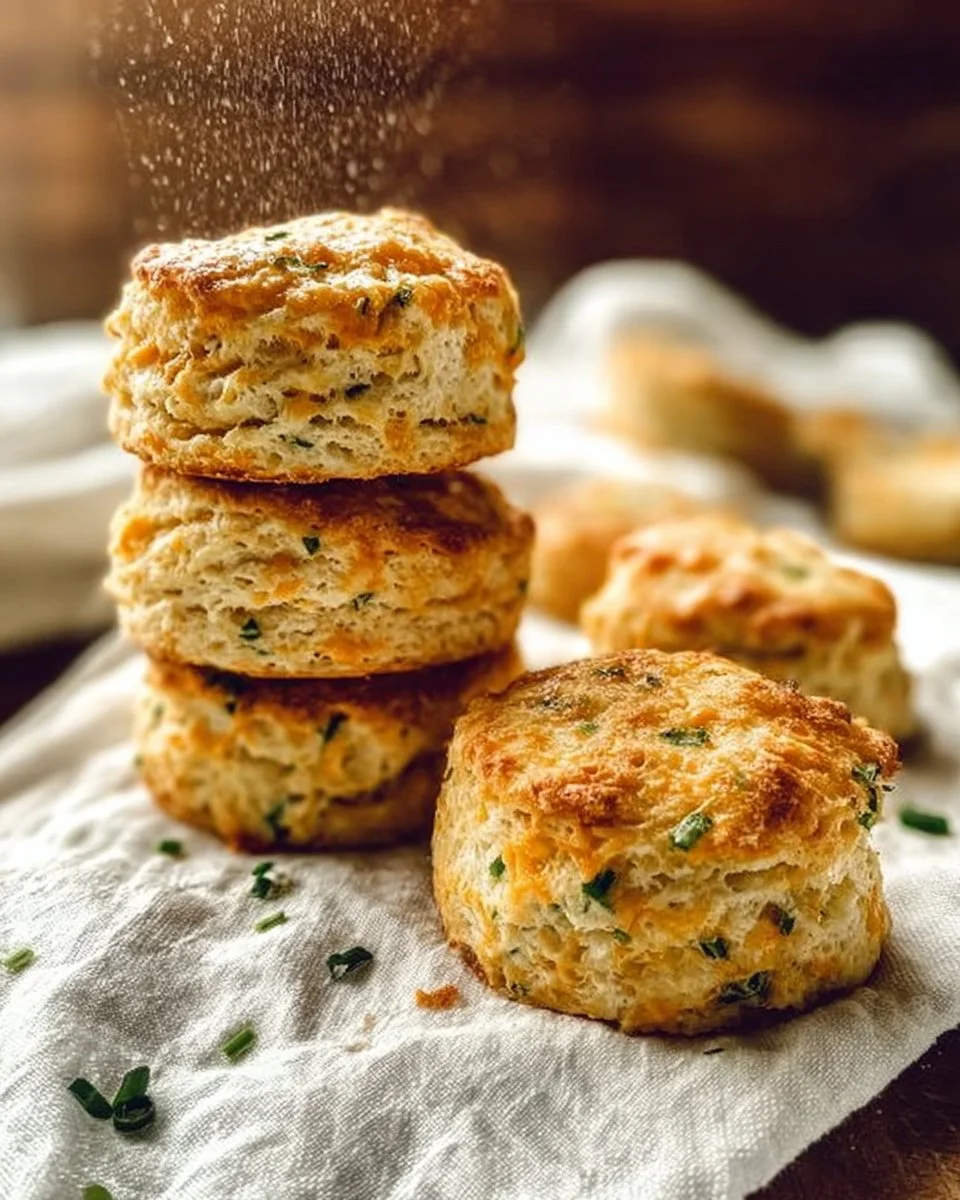
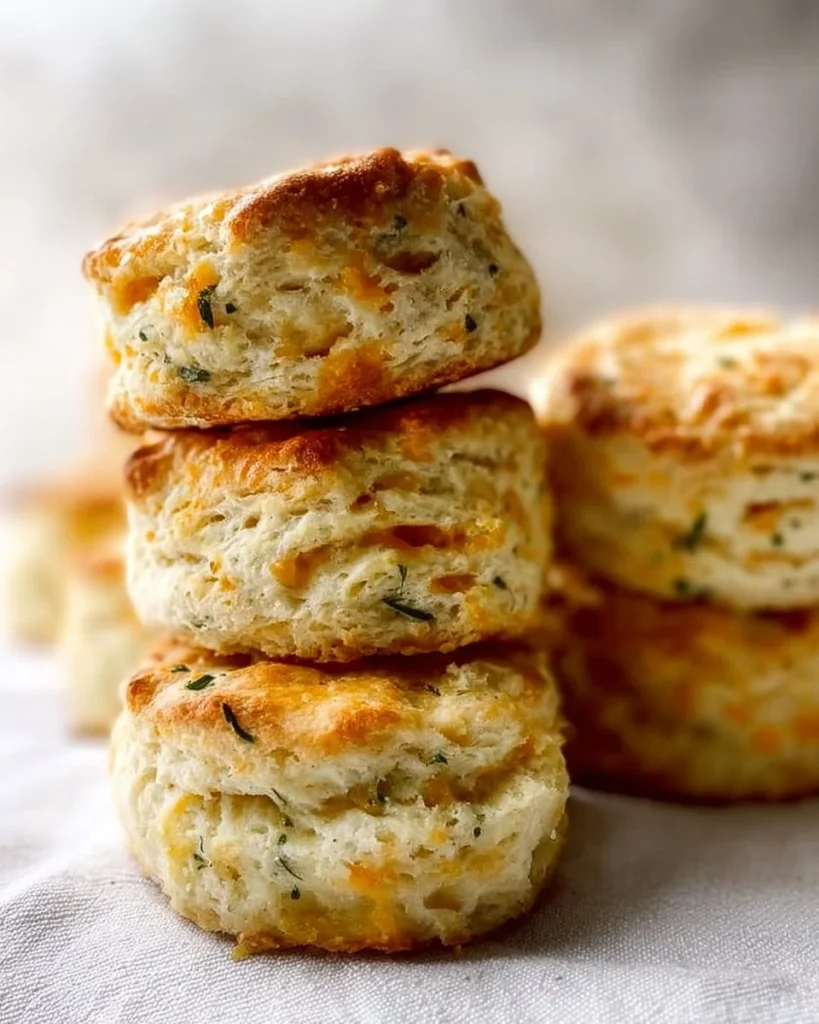
Cheddar Garlic & Chive Buttermilk Biscuits are soft, flaky, and full of flavor. These biscuits are great for breakfast, lunch, or a sides for dinner. They have sharp cheddar, garlic, and chives that taste fresh and rich. This recipe makes a batch you can share or save for later. If you like cheesy garlic bread, try our best cheesy garlic bread recipe for a similar savory twist.
These biscuits are easy to make and can fit into a simple meal plan. With a few smart swaps, they can become a healthier version of the classic. They can also be part of a lighter option for family meals or a great meal prep side to freeze for later.
WHY YOU WILL LOVE THIS RECIPE
- Quick to mix and bake in about 30 minutes.
- Cost friendly and uses simple pantry ingredients.
- Flexible: you can make a lighter option or a high protein meal with easy swaps.
- Great for meal prep — freeze extras and reheat for busy mornings.
- Satisfying savory flavor that works with many meals, from soups to salads.
These biscuits give comfort without a lot of fuss. They are a good choice for those who want a tasty bread side that can be adapted for weight loss plans or a balanced diet when portioned right.
HOW TO MAKE Cheddar Garlic & Chive Buttermilk Biscuits
This recipe uses cold butter and buttermilk for flaky layers and a tender crumb. Follow the step-by-step directions below for best results.
EQUIPMENT NEEDED
- Large mixing bowl
- Box grater (for frozen butter)
- Fork for mixing
- Rolling pin or a clean bottle for rolling
- 3-inch biscuit cutter
- 9-inch round cake pan lined with parchment paper
- Baking sheet (optional)
- Pastry brush for melted butter
- Freezer space for chilling
Ingredients You’ll Need :
- 1/2 cup butter, frozen and grated
- 2-1/2 cups AP flour
- 1 Tbsp baking powder
- 1/2 tsp baking soda
- 1 Tbsp sugar
- 1/2 tsp salt
- 1 tsp garlic
- 1 Tbsp dried chives ((can substitute parsley))
- 3/4 cup sharp cheddar cheese
- 1 cup buttermilk
- 2 Tbsp melted butter to brush on the biscuits after baking
STEP-BY-STEP INSTRUCTIONS :
- Preheat oven to 425. Line a 9″ round cake pan with sheet with parchment paper.
- Grate your frozen butter using a box grater then throw it back in the freezer until you need it.
- In a large bowl, whisk together the flour, baking powder, baking soda, sugar, salt, garlic powder and chives.
- Add the frozen butter and shredded cheese to the flour mixture and toss it all together using a fork.
- Make a well in the middle and add the buttermilk – stir using the fork just until it comes together.
- Empty the dough on to a lightly floured surface and gently bring it together with your hands to form it in to a rectangle. Note, it will be crumbly at first but it will come together as you do the rolling and folding. You do not want a very moist dough or you will have stodgy biscuits.
- Sprinkle very lightly with flour and roll it out to about 3/4 of an inch, then fold the dough in thirds on top of each other. Roll again and repeat the process 3-4 more times. This gives you the layers.
- Roll the dough down to a rectangle lightly until it is about an inch thick.
- Use a 3 inch biscuit cutter to cut out the biscuits. Push it straight down and pull straight up, making sure you don’t twist the cutter.
- Once you have cut out as many as you can, gently roll together all the leftover bits and continue to cut out biscuits until the dough is pretty much all gone. (I usually make 8 total and that fits the pan perfectly.)
- Place the biscuits on the pan, one in the middle and the others around it- they will be lightly touching each other.
- Place the whole pan in your freezer for 10 minutes to make sure those ingredients are still cold.
- Brush the tops of the biscuits with milk, buttermilk or cream.
- Bake at 425 for 14-16 minutes,
- Remove from oven and brush with melted butter immediately then serve!
HOW TO SERVE Cheddar Garlic & Chive Buttermilk Biscuits
Serve these biscuits warm for the best texture. They pair well with:
- A light salad and grilled chicken for a balanced meal.
- Stews or soups to soak up broth.
- Eggs and veggies for a hearty breakfast.
Portion control tips:
- One biscuit (about 3 inches) is a good single serving. Pair one biscuit with a lean protein and a vegetable to keep a meal balanced.
- For weight loss or low-calorie plans, choose one biscuit and fill your plate with a large salad or steamed vegetables. This keeps calories lower while still letting you enjoy a biscuit.
- For a high protein meal, add a lean protein like grilled chicken, turkey, or a bean salad on the side.
These biscuits fit well into meal plans when you control portions and add fiber-rich sides. For a balanced plate, aim for 1 biscuit, a palm-sized portion of protein, and two servings of vegetables.
STORAGE & FREEZING : Cheddar Garlic & Chive Buttermilk Biscuits
- Room temperature: Store cooled biscuits in an airtight container for up to 2 days.
- Refrigerator: Place in a sealed container for up to 5 days. Reheat in a warm oven at 350°F for 5–8 minutes.
- Freezer: Wrap each biscuit in plastic wrap and place in a freezer bag. Freeze for up to 3 months. To reheat, thaw in the fridge overnight or bake from frozen at 350°F for 10–15 minutes until heated through.
These biscuits are great for meal prep. Make a batch and freeze extras for quick breakfasts or sides. They warm well and keep a good texture when thawed and heated correctly.
SERVING SUGGESTIONS
- Pair with a bowl of vegetable soup and a green salad for a lower calorie, balanced dinner.
- Serve with grilled or roasted lean protein for a high protein meal that feels filling.
- For a brunch tray, add fresh fruit, scrambled eggs, and smoked salmon for a variety of flavors and nutrients.
- If you want a cheesy handheld, make mini breakfast sandwiches with egg whites and turkey for a lighter option.
For another savory bread idea to pair at brunch or dinner, try the tasty cheesy garlic chicken wraps; they make a great main to go with these biscuits.
VARIATIONS
-
Healthier version: Use 1 1/4 cups whole wheat flour and 1 1/4 cups all-purpose flour. Use reduced-fat sharp cheddar and reduce the butter brushed on top to 1 Tbsp. Swap sugar for a sugar-free baking blend if you like. This gives a whole grain boost and fewer saturated fats for a lighter option.
-
High-protein or low-carb version: For a higher protein, lower carb biscuit, try a recipe using 1 1/2 cups almond flour plus 1/2 cup whey protein isolate, 1 tsp baking powder, and 1/4 cup grated cheddar. Add 1/3 cup Greek yogurt and 1 egg to bind. Note this will change the texture from the classic biscuit but will make a good low carb and higher protein alternative for those watching carbs or aiming for a high protein meal.
-
Air fryer or oven-baked version: The original recipe is oven baked at 425°F. To use an air fryer, place 4–5 biscuits in the air fryer basket with parchment under them and air fry at 375°F for 10–12 minutes. Check at 8 minutes as air fryers vary. The air fryer gives a slightly crisper crust while keeping a soft center.
For a flavorful sandwich using these biscuits, consider the simple idea in this cheesy garlic chicken wraps article for inspiration and filling ideas.
FAQ

Q: Are these biscuits healthy?
A: The base recipe is a comfort food and higher in calories and carbs. You can make a healthier version by using whole wheat flour and reduced-fat cheese. Controlling portion size makes them fit into a healthy plan.
Q: Can I freeze the dough or baked biscuits for meal prep?
A: Yes. You can freeze baked biscuits for up to 3 months. For dough, shape and freeze the unbaked discs on a tray, then transfer to a bag. Bake from frozen with a few extra minutes in the oven.
Q: Are these biscuits good for weight loss?
A: They can be part of a weight loss plan if you control portions and pair them with lean protein and vegetables. Choosing a lighter option, such as a half biscuit or a whole wheat swap, helps lower calories while keeping flavor.
Q: Can I make these biscuits diabetic-friendly?
A: With swaps, yes. Use whole wheat, reduce added sugar, and keep portion size small. Pair biscuits with protein and fiber-rich sides to reduce blood sugar spikes. Talk to your dietitian for personal guidance.
Q: How do I keep biscuits flaky?
A: Keep ingredients cold, use frozen grated butter, and avoid overworking the dough. Fold and roll gently to build layers.
Q: Can I add fresh chives instead of dried?
A: Yes. Use about 1–2 Tbsp fresh chopped chives. Fresh herbs add brightness, and you can adjust to taste.
MAKE-AHEAD TIPS FOR Cheddar Garlic & Chive Buttermilk Biscuits
- Mix dry ingredients and grate frozen butter ahead of time. Keep butter cold in the freezer until you mix. This saves 10 minutes when you are ready to make dough.
- Form and cut biscuits, then freeze them on a tray for 1 hour. Transfer to a bag and bake from frozen when needed — add 2–4 minutes to baking time. This is great for quick breakfasts.
- Bake a full batch and freeze cooled biscuits in single layers with parchment between. Reheat a few in the oven or microwave for fast meal prep. These tips make these biscuits great for meal prep and busy weeks.
Cheddar Garlic & Chive Buttermilk Biscuits
Ingredients
Method
- Preheat oven to 425°F. Line a 9-inch round cake pan with parchment paper.
- Grate your frozen butter using a box grater and return it to the freezer.
- In a large bowl, whisk together the flour, baking powder, baking soda, sugar, salt, garlic powder, and chives.
- Add the frozen butter and shredded cheese to the flour mixture and toss together with a fork.
- Make a well in the middle and add the buttermilk, stirring until just combined.
- Transfer the dough to a lightly floured surface, gently bringing it together to form a rectangle. Note: It will be crumbly at first.
- Roll the dough out to about 3/4 of an inch thick, then fold it in thirds on top of each other. Roll again and repeat 3-4 more times.
- Roll the dough down to about an inch thick, and use a 3-inch biscuit cutter to cut out the biscuits.
- Place the biscuits in the prepared pan, ensuring they lightly touch each other.
- Place the pan in the freezer for 10 minutes.
- Brush the tops of the biscuits with milk, buttermilk, or cream.
- Bake at 425°F for 14-16 minutes.
- Remove from the oven and immediately brush with melted butter. Serve warm.